
14
2011How to use filters in landscape photography part 1 – Dynamic range and ND grads.

Part two of the filters tutorial, covering solid ND filters and the 10 stopper is now available here
One of the most common questions I see on forums from both beginners and serious amateurs relates to landscape photography. Most of the time, they have seen a fantastic scene or an amazing sunset and they try and capture this on their camera and end up disappointed when they find that either they have recorded the sky perfectly and have a black foreground or have a fantastic foreground and a completely white sky.
Ring any bells? Read on…
This is because, unlike our eyes, our cameras can only capture a certain amount of variance between darkness and light. This is called the ‘dynamic range’. My Canon 5D Mark 2 has an average dynamic range of 8 stops of light – many cameras have less than this and some will have more. The problem is, nature doesn’t stick to these artificial ‘dynamic ranges’ and often throws up huge variances between light and dark in everyday scenes.
Take for example your typical Caribbean beach scene – white sands, blue skies – maybe a fluffy white cloud or two, a beach recliner in the shade of a sun umbrella, a large stone or two on the beach casting a dark shadow on the sand… Something like this photo – Fantastic as far as your tan is concerned, but a nightmare for your camera! There could quite easily be 10-15 stops difference between the brightest part of the cloud and the darkest part of shade. So how can you play it?
- If you try and play it safe by identifying the ‘middle’ bit of the photograph, somewhere halfway between the lightest part and the darkest part then you’ll lose the detail in the cloud and the shade of the rocks
- If you expose for the brighter parts of the image (which is actually the best way to do things – but that’s for another article) then while you’ll get fantastic cloud detail your camera just won’t get any of the dark detail and you’ll just end up photographing black blobs on the ground.
- If you expose for the darker parts of the image (bad idea!) then while you get fantastic shadow detail you’ll have nothing whatsoever in the brighter areas.
Dealing with exposure blending first – this is a software technique where you take two (or more) photographs – one exposing for dark areas, one exposing for light areas and then blend them in photoshop. This is way too much work for me, I prefer to do my work in camera rather than on a computer, so for the purposes of this article (which is about filters anyway) we’ll just discount that as a solution and move on. However, to prove I have done it, here’s a photo from a few years ago – the sky was one photo, the field was another, then they were blended in Photoshop. Meh.

There are also two types of ND grad – hard and soft. This refers to how quick it transitions between the grey bit and the clear bit. For compact cameras and DSLR’s all you need to worry about is buying the hard grads – the reason for this is that the sensor in your camera is so small that if you bought the soft grads your camera would not be able to ‘see’ the darkest part of the filter as well as the clear part, so they’re worthless!
The important thing to bear in mind is that this grey part is ‘neutral’ (or at least it should be… I’ll come to this in a bit). This means that this grey part of the filter is in essence invisible to the camera – there is no colour in it, so all it does is make parts of the scene darker than others. Unfortunately, some of the cheaper filters aren’t quite neutral grey – Cokin are legendary for having a purple tint to them for example – which will then make the filtered part of your photo slightly purple. You may like the effect, you may not – but as long as you’re aware of it you can make the decision! So – moving on, what we now have is a bit of polyester / resin / glass with a dark part and a clear part – excellent!

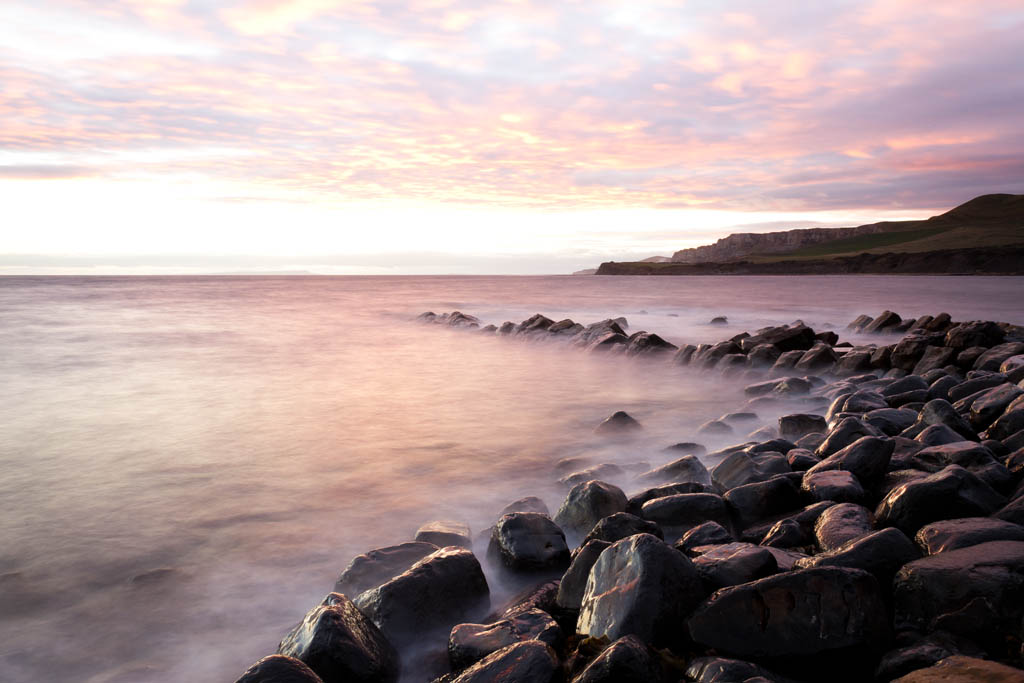
Damn! Our rocks look great, but as the camera’s exposed for those we’ve lost all the detail in the sky as it’s outside the camera’s dynamic range. That’s not what we wanted at all.
What we need is our ND grad to darken the sky and bring it within the dynamic range of the camera. As I mentioned above, there are a number of strengths you can use – 1 stop, 2 stop and 3 stop being the most common. How do you know which to use? There are two main methods…
- The scientific method. Put your camera in spot metering mode. Set the camera to manual. Choose your aperture for the scene (which will typically be around f/11 for a landscape like the above), then look through your viewfinder, point the camera at the sky and twiddle your shutter speed button until your camera is registering a ‘correct’ exposure. (This is usually signified in your viewfinder by the meter looking a bit like this – -2…-1…|…1…2 – the bar in the middle). Then point your camera at the ground – you’ll immediately see the meter in your viewfinder look something like this – |-2…-1…0…1…2 – with the bar shooting off to the left to say you’re underexposed. Twiddle your shutter speed button until the bar is back in the middle, making a note of how many ‘clicks’ you’ve done. If you have a standard DSLR, divide that number by 3 and that’s the amount of stops difference you have. Pull out the filter that corresponds to the difference!
- Guess which one to use. This is what I do. I get my 3 stop grad out and start from there.
We now know which filter to use and we have our holder mounted on our camera, so the next thing to do is to put the filter in. With the dark bit at the top, slide the filter downwards into the holder, looking through your viewfinder as you do it. You’ll see the top of the scene darkening as you slide the filter lower – stop when you reach the horizon.

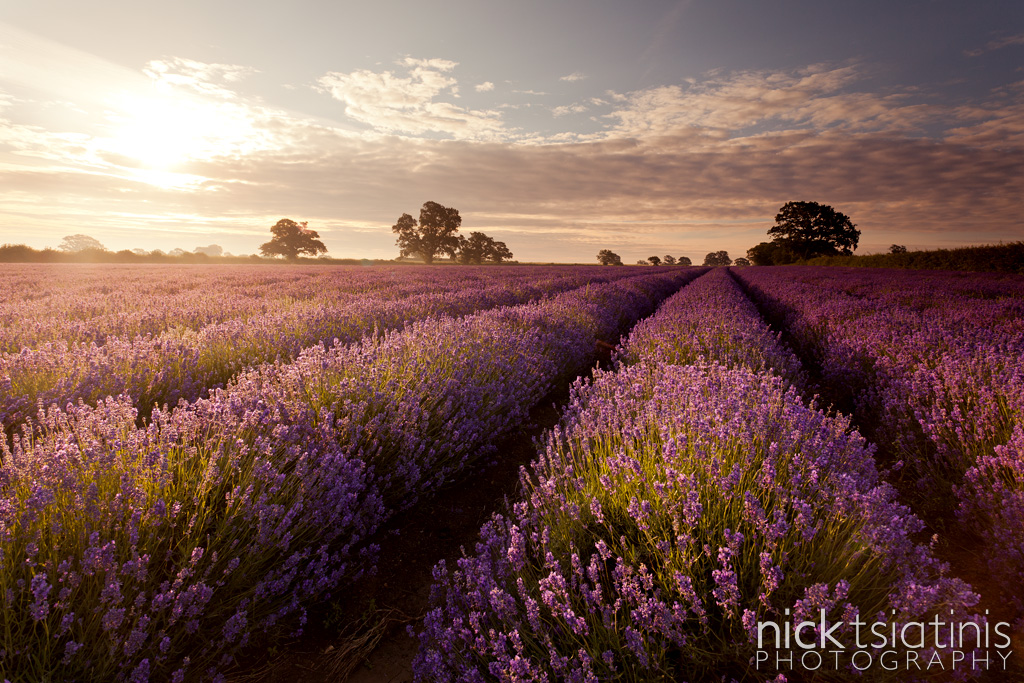
Job done! We’ve darkened the top of the photo to the horizon, bringing the sky back within the usable dynamic range of the camera – we’ve managed to keep detail in the clouds and sky (we’ve still lost a little at the horizon where the sun is still so bright, but it’s not too much to be distracting) and we’ve still got our detail in the rocks. Perfect!
Because I don’t want to just leave you with one photo, here’s another with the same setup…

With all the brands out there at the moment, what should you buy?
That brings me to the end of part one of my filters tutorial, and hopefully you now have more of an idea how to use ND grads and why you would want to use them in the first instance! The next instalment will be on solid ND filters – including the magical ’10 stop’ filter – stay tuned!
Error: Contact form not found.

How to use filters in landscape photography part 2 – Solid ND’s and the magic of the 10 stop filter!
[…] Shop « How to use filters in landscape photography part 1 – Dynamic range and ND grads. […]
Rebecca
Thank you so much…this was very useful! I´ve just purchased the Lee system and look forward to trying it! 🙂